I hear people ask all the time for good ab exercises. I do want to make one thing clear: Abdominal fat is not just about exercise, its also about your diet and what you are putting in your body. That is an entire post in itself. Diet aside, the following routine is what I taught at the end of a kickboxing or cardio interval class at the University of Miami. It had many undergrads screaming for mercy, partly because we had just finished 50 minutes of intense cardio.
This workout is not meant to be done alone - it's something you should tack on to the end of a cardio session. Whether you have just completed a walk outside, a run on your treadmill, or your favorite workout video, try these ab exercises before your stretching session to help keep your mid-section trim and toned.
Remember to warm up before your workout, rest when needed, drink plenty of fluids, and cool down and stretch at the completion of your routine. Always consult a doctor before beginning any new fitness routine.
Happy Fitness!
Sarah
Sarah's 10 Minute Ab Routine
Work your way up to 3 sets of 10 repetitions of each exercise, with no rest in between (unless otherwise stated). Each rep should be about 2 seconds up and 2 seconds down. I found that if you count in sets of 10, you will be less likely to be focused on the possibly intimidating number of 30. I have included different levels of some of the exercises to challenge all fitness levels.
- Crunches: 30 reps
Level 1 - basic crunch, hands behind your head
Level 2 - v sit-ups, lay on back, legs extended out in a v position, hands above head, pushing arms through your legs on way up
Level 3 - v sit ups with a medicine ball or weight
- Oblique Twists, also called Russian Twists: 30 each side
Level 1- sitting with heels on the floor leaning back slightly, hands together, twisting from one side to another and touching the floor each time
Level 2 - with medicine ball or weight
Level 3 - with medicine ball or weight and feet off of floor
-Planks: Hold for 30 sec, rest 30 sec, then hold for another 30 sec
Level 1: on elbows, form is everything, do not let your back droop or put your butt too high in the air
Level 2: in push up position
Level 3: with alternating arms and legs out
- Leg Push up: 30 reps
start with your arms by your side, legs in air bent at 90 degrees so that your calves are parallel to the ground; push your legs up to the ceiling lifting your lower back off of the floor. Do not rock your legs back and forth, use your ab muscles to push upward and back down.
- Double Crunch: 30 reps
sitting up with arms behind you, hands on the floor (finger tips pointing towards your body), elbows bent, leaning back and legs extended off the ground, bend your legs bringing your knees to your chest and then extend your legs back out as you lean backwards (moving your knees and chest both in towards and away from one another, hence the name double crunch)
- Side Crunch: 30 reps single leg, 30 reps double leg, repeat on other side
lay on your left side up on your left elbow, right arm behind your head, crunch sideways bringing your right leg to your elbow and back down. After 30 reps, bring both legs off the ground to your elbow and back down (you may have to roll off your hip and onto your left butt cheek to make this more comfortable). Do 30 reps of both legs. Repeat on your right side with your left leg first, then both legs.
- Bicycle Crunches: do 2 sets of 10 on each side slowly, then 2 sets of 10 each side in double time
hands behind head, legs extended off of ground, bring right knee to left elbow and then left knee to right elbow, alternating sides; legs should be moving in a motion as if you where riding a bicycle
STRETCH!!!

Monday, May 6, 2013


Sunday, May 5, 2013
Week 18 - maintenance
Now that we're entering May, I've been doing this healthy home revolution for 4 months! Crazy!!!
Fitness - This past Monday I threw out my back. OUCH!!! Not only was it painful just to walk that morning, baby girl wanted me to carry her around. So I had to adjust my mindset about working out this week. Did I give it up? absolutely not!!! I would like to maintain my current weight and continue to build muscle mass, tone up more. So I did what I could to stay active but not make the injury worse. I walked every day this week, most days a minimum of 45-60 minutes and sometimes longer. I walked as fast as I could (without experiencing pain - this was different each day). I also did a lot of stretching to keep my muscles loose. Now, almost a week later, I feel almost back to my usual self and added some running today. Sometimes we need to listen to our bodies and be mindful. I encourage you to do the same.
Healthy Home Foods - I haven't been cooking as often in recent weeks, partly because of life circumstances and also because it has become less of a priority for me. I make a weekly meal plan and do my best to stick with it, but sometimes life just happens. My kids need my attention more than I need to cook dinner; my husband is working late and my motivation is low; sleepless nights and busy days mean less energy to cook. We've all been there...we start the week off with great intentions, but things just happen. And that is OKAY!!! Just continue to make smart food choices, whether eating out, ordering in, or eating leftovers. I sometimes have to remind myself of these things.
So on that note, you will find this week's meal plan below along with any links to the recipes that have inspired me. I hope that you all have a great week!
Happy Cooking!
Sarah
Week 18 - May 5, 2013
Sunday: date night
Monday: balsamic glazed salmon with sautéed snap peas, edamame, brown rice
http://www.foodnetwork.com/recipes/giada-de-laurentiis/balsamic-glazed-salmon-recipe/index.html
Tuesday: fundraiser for Elliot Pearson Children's School - Flatbread Pizza
Wednesday: fusilli with spinach, black pepper, and cheese, roasted asparagus, and grilled chicken tenders
http://www.foodnetwork.com/recipes/giada-de-laurentiis/fusilli-with-pecorino-romano-and-black-pepper-recipe/index.html
http://www.livestrong.com/article/447891-how-to-bake-chicken-strips-in-italian-dressing/
Thursday: baked potato with sausage & arugula sauce, Caesar salad
http://www.foodnetwork.com/recipes/giada-de-laurentiis/baked-potatoes-with-sausage-and-arugula-sauce-recipe/index.html
Friday: pizza night
Saturday: leftovers
Fitness - This past Monday I threw out my back. OUCH!!! Not only was it painful just to walk that morning, baby girl wanted me to carry her around. So I had to adjust my mindset about working out this week. Did I give it up? absolutely not!!! I would like to maintain my current weight and continue to build muscle mass, tone up more. So I did what I could to stay active but not make the injury worse. I walked every day this week, most days a minimum of 45-60 minutes and sometimes longer. I walked as fast as I could (without experiencing pain - this was different each day). I also did a lot of stretching to keep my muscles loose. Now, almost a week later, I feel almost back to my usual self and added some running today. Sometimes we need to listen to our bodies and be mindful. I encourage you to do the same.
Healthy Home Foods - I haven't been cooking as often in recent weeks, partly because of life circumstances and also because it has become less of a priority for me. I make a weekly meal plan and do my best to stick with it, but sometimes life just happens. My kids need my attention more than I need to cook dinner; my husband is working late and my motivation is low; sleepless nights and busy days mean less energy to cook. We've all been there...we start the week off with great intentions, but things just happen. And that is OKAY!!! Just continue to make smart food choices, whether eating out, ordering in, or eating leftovers. I sometimes have to remind myself of these things.
So on that note, you will find this week's meal plan below along with any links to the recipes that have inspired me. I hope that you all have a great week!
Happy Cooking!
Sarah
Week 18 - May 5, 2013
Sunday: date night
Monday: balsamic glazed salmon with sautéed snap peas, edamame, brown rice
http://www.foodnetwork.com/recipes/giada-de-laurentiis/balsamic-glazed-salmon-recipe/index.html
Tuesday: fundraiser for Elliot Pearson Children's School - Flatbread Pizza
Wednesday: fusilli with spinach, black pepper, and cheese, roasted asparagus, and grilled chicken tenders
http://www.foodnetwork.com/recipes/giada-de-laurentiis/fusilli-with-pecorino-romano-and-black-pepper-recipe/index.html
http://www.livestrong.com/article/447891-how-to-bake-chicken-strips-in-italian-dressing/
Thursday: baked potato with sausage & arugula sauce, Caesar salad
http://www.foodnetwork.com/recipes/giada-de-laurentiis/baked-potatoes-with-sausage-and-arugula-sauce-recipe/index.html
Friday: pizza night
Saturday: leftovers
Friday, May 3, 2013
Food, Health Benefits and Seasonal Allergies
I haven't been as active on this blog as I wanted to be this week. We are having some major sleep issues with baby girl. She's never been a great sleeper, but lately there is something going on. After discussing it with doctors, we have come to one conclusion: we have no idea!!! So frustrating! Could be separation anxiety, the slight (but not large enough to be treated) ear infection, food, or teething. So it's just monitoring and keeping a close log of food intake and sleep habits. So needless to say, much of my spare time has been spent reading things to help us solve this problem in the long wrong. So enough about my week, let's discuss allergies!

You've heard me discuss the health benefits of fruits and vegetables before, but let's talk about the benefits of these foods in combating spring allergies. My entire family has hay fever and seasonal allergies. My allergies have been pretty bad this week: itchy eyes, runny nose, headache. And my toddler has been sneezing his little head off.I'll do anything to help my symptoms. So why not eat the foods that could help?
8 foods that fight spring allergies:
Citrus, grapes, broccoli, collards, onions, garlic, nuts, apples, fish
Eat local honey! Research shows that eating local honey created by the same pollen that might be causing your seasonal allergies can help reduce your symptoms. Check out this article:
http://health.howstuffworks.com/diseases-conditions/allergies/allergy-treatments/local-honey-for-allergies.htm
Here are a few more health benefits of fruits and vegetables:


You've heard me discuss the health benefits of fruits and vegetables before, but let's talk about the benefits of these foods in combating spring allergies. My entire family has hay fever and seasonal allergies. My allergies have been pretty bad this week: itchy eyes, runny nose, headache. And my toddler has been sneezing his little head off.I'll do anything to help my symptoms. So why not eat the foods that could help?
8 foods that fight spring allergies:
Citrus, grapes, broccoli, collards, onions, garlic, nuts, apples, fish
Eat local honey! Research shows that eating local honey created by the same pollen that might be causing your seasonal allergies can help reduce your symptoms. Check out this article:
http://health.howstuffworks.com/diseases-conditions/allergies/allergy-treatments/local-honey-for-allergies.htm
Here are a few more health benefits of fruits and vegetables:
Sunday, April 28, 2013
Week 17- finally!
Yesterday, I had one of those moments that sort of validated what you are doing. It felt good and I wanted to share. While the baby was asleep at home with daddy, I took my little boy to the playground near our house. I knew this was my chance to sneak a workout in while he played, so here's what we did: He rode his bike to the playground (probably .5 mile) while I ran beside him. Then as he played, (mostly independently with my close supervision), I proceeded to climb the playground equipment, run around by chasing him, and use the park bench to do other exercises (such as tricep dips, push ups, squats, step ups, etc). Most of the time we were alone, but other parents came and went. It didn't stop me - at my age, I've learned to really not care what other people think. But one dad stopped and said something to me, a point I've been trying to drive home in my Healthy Home posts. He said, "Got to fit in a workout wherever and whenever you can, right?". YES!!! That's exactly what I've been talking about and he gets it. So don't get discouraged if you don't make it to the gym, or get out alone for your run. Find a way to make it work - it is possible! Even if the other parents at the park are staring. Ha!
So enough about fitness, let's talk food. I love to try new recipes so this week (and most weeks from now on) will be a combination of new recipes and recipes I've already posted. I have more evening events than usual which means I'm not doing as much cooking for dinner. I'm hoping to make something yummy for myself to enjoy at lunch time, so I'll keep you posted if I squeeze in any of my ideas. Have a great week!
Happy Cooking!
Sarah
Week 17 - April 28, 2013
Sunday: date night
Monday: last parent/teacher meeting at my child's school - dinner and childcare provided
Tuesday: girls night out
Wednesday: Italian Baked Chicken, garden salad, roasted broccoli
http://deliciouslydomesticdining.blogspot.com/2013/01/italian-baked-chicken.html
Thursday: lemony shrimp risotto with arugula, caesar salad, roasted asparagus
http://www.giadadelaurentiis.com/recipes/1054/lemony-shrimp-and-risotto
Friday: pizza night
Saturday: leftovers
And if the day allows for it, here are a couple lunch ideas I would love to give a whirl:
Lemon Quinoa Cilantro Chickpea Salad with Tomatoes & Avocados
http://thediva-dish.com/uncategorized/healthy-living-class-green-drinks-sweet-eats-and-salads/
Chicken, Pesto, and Spinach Quinoa
http://seajetcook.wordpress.com/2012/04/28/chicken-pesto-and-spinach-quinoa/
So enough about fitness, let's talk food. I love to try new recipes so this week (and most weeks from now on) will be a combination of new recipes and recipes I've already posted. I have more evening events than usual which means I'm not doing as much cooking for dinner. I'm hoping to make something yummy for myself to enjoy at lunch time, so I'll keep you posted if I squeeze in any of my ideas. Have a great week!
Happy Cooking!
Sarah
Week 17 - April 28, 2013
Sunday: date night
Monday: last parent/teacher meeting at my child's school - dinner and childcare provided
Tuesday: girls night out
Wednesday: Italian Baked Chicken, garden salad, roasted broccoli
http://deliciouslydomesticdining.blogspot.com/2013/01/italian-baked-chicken.html
Thursday: lemony shrimp risotto with arugula, caesar salad, roasted asparagus
http://www.giadadelaurentiis.com/recipes/1054/lemony-shrimp-and-risotto
Friday: pizza night
Saturday: leftovers
And if the day allows for it, here are a couple lunch ideas I would love to give a whirl:
Lemon Quinoa Cilantro Chickpea Salad with Tomatoes & Avocados
http://thediva-dish.com/uncategorized/healthy-living-class-green-drinks-sweet-eats-and-salads/
Chicken, Pesto, and Spinach Quinoa
http://seajetcook.wordpress.com/2012/04/28/chicken-pesto-and-spinach-quinoa/
Saturday, April 27, 2013
No-fat Added Breakfast Muffins
A friend of mine emailed me this recipe and I just had to try it. We love muffins in this house. I love to eat them with peanut butter for a quick breakfast and I love to give them to my children for a snack. This recipe is awesome and very versatile. Make it your own and feel free to make substitutions, additions, or omissions. So yummy and satisfying! And they are so moist you would never know they have no added fat! Awesomeness!!! I'm going to make them again this weekend using applesauce instead of pumpkin and adding in some wheat bran. I'll let you know how they come out.
Happy Baking!
Sarah

No-fat added Breakfast Muffins
based on this recipe from the pioneer woman:
http://thepioneerwoman.com/cooking/2013/04/my-moms-muffins/
1 cup whole wheat flour
1/2 cup all-purpose flour
1/4 cup round flaxseed/flaxseed meal
1 cup regular oats
1/2 cup packed brown sugar
1/2 teaspoon salt
1 teaspoon baking soda
2 teaspoons baking powder
1/2 teaspoon cinnamon
1 cup buttermilk
1 egg, beaten
1 banana, mashed
3/4 cup pumpkin puree (the original recipe called for 1/2 cup of apple sauce, so use whatever you have in your house)
1/4 cup molasses
1/2 cup walnuts, chopped (I only sprinkled 1/4 walnuts on half the muffins - I wanted the baby to be able to eat some and she can't eat nuts yet)
Preheat your oven to 350 degrees and grease a muffin tin (I used Pam baking spray). In a medium sized bowl, mix the dry ingredients together and set aside.
In a larger bowl, mash the banana and add the other wet ingredients (buttermilk, egg, pumpkin, molasses). Whisk together to ensure that all the wet ingredients are well incorporated. Now add the dry ingredients (and nuts if you are adding them to all muffins) to the wet and stir only until combined. Don't over mix or you'll get a tough muffin. Using an icecream scoop or a large spoon, divide batter evenly in the pan (this recipe should only yield 12 muffins).
I topped 6 muffins with some crushed nuts. I needed to keep some nut-free for my kids, but I LOVE nuts! Yummy!!!

Bake at 350 for 16-20 minutes or until toothpick comes out clean. Allow the muffins to cool in the pan for 10 minutes or until cool to the touch. Serve immediately or store in an airtight container.
Enjoy!
Happy Baking!
Sarah

No-fat added Breakfast Muffins
based on this recipe from the pioneer woman:
http://thepioneerwoman.com/cooking/2013/04/my-moms-muffins/
1 cup whole wheat flour
1/2 cup all-purpose flour
1/4 cup round flaxseed/flaxseed meal
1 cup regular oats
1/2 cup packed brown sugar
1/2 teaspoon salt
1 teaspoon baking soda
2 teaspoons baking powder
1/2 teaspoon cinnamon
1 cup buttermilk
1 egg, beaten
1 banana, mashed
3/4 cup pumpkin puree (the original recipe called for 1/2 cup of apple sauce, so use whatever you have in your house)
1/4 cup molasses
1/2 cup walnuts, chopped (I only sprinkled 1/4 walnuts on half the muffins - I wanted the baby to be able to eat some and she can't eat nuts yet)
Preheat your oven to 350 degrees and grease a muffin tin (I used Pam baking spray). In a medium sized bowl, mix the dry ingredients together and set aside.
In a larger bowl, mash the banana and add the other wet ingredients (buttermilk, egg, pumpkin, molasses). Whisk together to ensure that all the wet ingredients are well incorporated. Now add the dry ingredients (and nuts if you are adding them to all muffins) to the wet and stir only until combined. Don't over mix or you'll get a tough muffin. Using an icecream scoop or a large spoon, divide batter evenly in the pan (this recipe should only yield 12 muffins).
 |
| I forgot to take a picture of the steps along the way, so here is one of the empty mixing bowls! HA! |
 |
| Almost ready for the oven... |

Bake at 350 for 16-20 minutes or until toothpick comes out clean. Allow the muffins to cool in the pan for 10 minutes or until cool to the touch. Serve immediately or store in an airtight container.
Enjoy!
Friday, April 26, 2013
Low-fat Mustard Dill Potato Salad
What screams summer and barbeques more than a good potato salad recipe??? But who wants all the calories of the traditional mayonnaise laden recipe. I used a popular trick these days and instantly took have the fat and calories away - I substituted half the mayonnaise for greek yogurt. The best part? No one knew the difference!!! Not even me...and I'm picky. I will only use one type of mayonnaise that rhymes with shmellmans because I can tell the difference in flavors. I really can! I've tried a lot of different kinds of shmellmans too. I don't mind the kind made with olive oil, so that's what I buy. It does save some fat and calories from the regular version. The light and other versions just taste yucky to me...but that's just me.
Now back to this delicious potato salad! Of course you need to like two things for this to be your new "go to" recipe: mustard and dill. If you do, then you are in luck! Give this recipe a try and you won't be disappointed!
Low-fat Mustard Dill Potato Salad
recipe based on
http://www.foodnetwork.com/recipes/ina-garten/potato-salad-recipe/index.html
 Toss well, cover, and
refrigerate for a few hours to allow the flavors to blend. So yummy! Enjoy!
Toss well, cover, and
refrigerate for a few hours to allow the flavors to blend. So yummy! Enjoy!

Now back to this delicious potato salad! Of course you need to like two things for this to be your new "go to" recipe: mustard and dill. If you do, then you are in luck! Give this recipe a try and you won't be disappointed!
Low-fat Mustard Dill Potato Salad
recipe based on
http://www.foodnetwork.com/recipes/ina-garten/potato-salad-recipe/index.html
3 pounds small white potatoes
Kosher salt
Kosher salt
1/2 cup mayonnaise (use light, made with olive oil, or any version you can tolerate or usually have in your fridge)
1/2 cup 2% greek yogurt
1/4 cup buttermilk
2 tablespoons Dijon mustard
2 tablespoons yellow mustard
1/2 cup chopped fresh dill
Freshly ground black pepper
1/2 cup chopped celery
1/2 cup chopped onion
1/4 cup buttermilk
2 tablespoons Dijon mustard
2 tablespoons yellow mustard
1/2 cup chopped fresh dill
Freshly ground black pepper
1/2 cup chopped celery
1/2 cup chopped onion
2 dill pickle spears, finely chopped (like a relish consistency...use 1/4 cup of dill pickle relish if you have it and save yourself the pain of chopping 2 pickle spears)

Place the potatoes and 2 tablespoons of salt in a large pot of
water. Bring the water to a boil, then lower the heat and simmer for 10
to 15 minutes, until the potatoes are barely tender when pierced with a
knife. Drain the potatoes in a colander, then place the colander with
the potatoes over the empty pot and cover with a clean, dry kitchen
towel. Allow the potatoes to steam for 15 to 20 minutes. Remove the towel and allow the potatoes to cool down. When the potatoes are cool enough to
handle, cut them in quarters or in half, depending on their size. Place
the cut potatoes in a large bowl.
Meanwhile, in a large bowl, start assembling the rest of the ingredients. Add the celery and red onion.
Meanwhile, in a large bowl, start assembling the rest of the ingredients. Add the celery and red onion.

Add the mayonnaise, greek yogurt, buttermilk, Dijon
mustard, yellow mustard, dill, dill pickles, and 1 teaspoon
of pepper. (I did not add any salt because of the dill pickles and dill pickle juice, but you may find it needs more salt - my husband did).
 |
| Lot of dill!!! |
 |
| more chunky ingredients... |
 |
| And the dressing after everything is added. Only thing missing is the potatoes! |
While the potatoes are still warm,
pour enough dressing over them to moisten.
 |


Crockpot BBQ Babyback Ribs
My husband LOVES ribs and I've never attempted to make my own before Wednesday. Baby back ribs were on sale at my grocery store this week so I thought I would give them a whirl.
After our first baby, good friends brought us dinner - ribs. They were beyond good so I asked her how she made them. She said she used her crockpot! Seriously??? I did some research and found a recipe that looked promising. I didn't use her BBQ sauce recipe because I didn't have time before our scheduled playdate. Instead, I used a bottle of our favorite BBQ sauce. Again, not the healthiest choice, but I needed to save time. You can find the full recipe at:
http://www.the-girl-who-ate-everything.com/2012/12/slow-cooker-barbecue-ribs.html
These were amazing! Even the baby was gobbling up the meat. I made 4 lbs and we hardly had any leftovers. I served them with roasted broccoli and a low-fat mustard dill potato salad. And with the warm weather back, it's grilling season! So instead of starting or finishing them up in the oven, use your grill! I hope you give them a try!
Happy Cooking!
Sarah
 Crockpot BBQ Babyback Ribs
4 lbs of baby back pork ribs
1/2 tsp each salt, pepper, onion powder, garlic powder
1 bottle of your favorite BBQ sauce
1/4 cup water
Before we stick these bad boys in the crockpot to slow roast and melt in your mouth for 8 hours, we need to give them some color. Preheat your oven to 400 degrees. Cut the rack in half (this makes it easier to fit in the crockpot later). Sprinkle both sides with the salt, pepper, onion and garlic powder.
 Bake for 15 minutes, flip and bake for 15 minutes more. The fat with render out, leaving it on the baking sheet and not in your crockpot. This step also caramelizes the meat which will give it good flavor in the long run. Place the ribs in the crockpot and pour the BBQ sauce on top. Fill the bottle with 1/4 cup of water, shake the bottle, and pour it into the crockpot to get the remaining BBQ sauce out.

Cook on low for 8 hours and try not to take the lid off. Let the ribs just be and they will be falling off the bone tender.
At this point you can serve the ribs as is, with a side of the BBQ sauce from the crockpot. However, you can also caramelize the sauce some more and throw them back in the oven at 400 for 10-15 minutes. (Or throw them on the grill for some grill marks, caramelizing, and great smoky flavor).
Serve these with your favorite sides. Enjoy!
After our first baby, good friends brought us dinner - ribs. They were beyond good so I asked her how she made them. She said she used her crockpot! Seriously??? I did some research and found a recipe that looked promising. I didn't use her BBQ sauce recipe because I didn't have time before our scheduled playdate. Instead, I used a bottle of our favorite BBQ sauce. Again, not the healthiest choice, but I needed to save time. You can find the full recipe at:
http://www.the-girl-who-ate-everything.com/2012/12/slow-cooker-barbecue-ribs.html
These were amazing! Even the baby was gobbling up the meat. I made 4 lbs and we hardly had any leftovers. I served them with roasted broccoli and a low-fat mustard dill potato salad. And with the warm weather back, it's grilling season! So instead of starting or finishing them up in the oven, use your grill! I hope you give them a try!
Happy Cooking!
Sarah

4 lbs of baby back pork ribs
1/2 tsp each salt, pepper, onion powder, garlic powder
1 bottle of your favorite BBQ sauce
1/4 cup water
Before we stick these bad boys in the crockpot to slow roast and melt in your mouth for 8 hours, we need to give them some color. Preheat your oven to 400 degrees. Cut the rack in half (this makes it easier to fit in the crockpot later). Sprinkle both sides with the salt, pepper, onion and garlic powder.


 |
| I forgot to take a picture of them when they came out of the oven, but you can tell by the pan that they browned up nicely. |
Cook on low for 8 hours and try not to take the lid off. Let the ribs just be and they will be falling off the bone tender.
 |
| Yummy! |
 |
| As you can see, they look great before I put them in the oven. |
 |
| And after...who's ready to eat? |
 |
Thursday, April 25, 2013
Skinny White Chicken Chili Enchiladas
Looking for a delicious, low-fat, easy, at-home, creamy enchilada recipe? This is it! So yummy and I almost forgot to mention, easy on your hips too! Each enchilada comes in at less than 300 calories!!! Definitely worth a try. My husband really enjoyed them and even asked to take the leftovers for lunch (and he's not a big leftover person). Yay! I made these on Tuesday and I've been enjoying them for lunch this week too. I should also mention that my toddler helped me make these, almost every step of the way.
So there is one aspect of this recipe I'm not proud of - I'm not a huge fan of using cream soup from a can, but I did crack under pressure and use it for this recipe. If you are completely opposed, just make a simple bechamel sauce (such as this recipe http://www.epicurious.com/recipes/food/views/White-Sauce-or-Bechamel-Sauce-40046). But today I needed to save myself the time and just use the dreaded can of soup. I served this fantastic creation with some fat-free refried beans (I had left over from the baked tacos last week) and sauteed greens.
Happy Cooking!
Sarah
 Skinny White Chicken Chili Enchiladas
recipe based on http://skinnymom.com/2012/05/11/skinny-sour-cream-enchiladas/?_szp=160707
16 oz. fat free sour cream
1 can fat free cream of chicken soup
1/4 cup chopped fresh cilantro
2 1/2 cups cooked shredded chicken breast (recipe I used is below)
1 small onion, chopped
1 can diced tomatoes with green chilies
1 can diced green chilies
8-10 low carb tortillas (my recipe made 10, but my tortillas were small)
1 cup shredded reduced fat pepper jack and colby cheese blend
If you have some leftover chicken, then go ahead and use it up. But if you are like me and need to create some shredded chicken for this recipe then please see below for my quick and easy cilantro lime poached chicken.
To poach the chicken: Fill a large frying pan half way with water. Add 2 boneless, skinless chicken breasts (trimmed of all fat) and sprinkle them generously with salt and pepper. Then add the following to the poached liquid: 2 cloves of garlic cut in half, 1/2 small onion cut in half, 1/2 lime cut into 4 pieces (juice squeezed into pan and rind thrown in) and 4 sprigs of cilantro.
Cook covered over medium heat for 20-30 minutes, or until cooked through.
Remove the chicken from the pan and shred. Set 2-2.5 cups aside for the recipe and save the rest for salads.

Now to the enchiladas: We will continue to use the same frying pan for this entire recipe, (especially since I'm always looking for a way to cut down on the number of dishes to wash). So wipe the pan out with a damp paper towel and put back on the heat. Add 1 T of olive oil and the chopped onion. Cook the onion until translucent. Add the canned tomatoes with chilies and the can of chilies. Stir to combine. Cook for 2-3 minutes or until heated through.
 Take off the heat and add the shredded chicken.
 Time to stuff and roll the tortillas. You can see from the picture below that I put about 1/2 cup of filling in each tortilla and roll (no burrito folding, just roll). Place the enchiladas in a 9x13 inch pan sprayed with cooking spray.
 Continue to form enchiladas until the filling is gone. The recipe should yeild 8-10, depending on the size of tortilla used and the amount of filling in each.

Now it's time to make the white chili cream sauce. Using the same pan again, (no wiping out this time - you want all that goodness and flavor) add the sour cream, cream soup, and chopped cilantro. Mix until well incorporated. Continue to stir over medium heat until warmed. Be careful not to bring to a boil, just allow it to heat up.
The sauce should look like this when ready to go:

Now pour the sauce over the enchiladas and spread evenly. It may look like a lot, but it will settle as it cook in the oven.


Sprinkle the cheese on top and bake at 400 degrees for 20-30 minutes, until the sauce is bubbly and the cheese is melty.
 Sprinkle with more fresh cilantro, if desired, and let rest for 5-10 minutes. Serve with your favorite sides.
 Tonight we had some refried beans and sauteed greens on the side (no need for rice - there are enough carbs on this plate!). So yummy! And I really loved the white chili cream sauce with the greens too. Enjoy!!!

So there is one aspect of this recipe I'm not proud of - I'm not a huge fan of using cream soup from a can, but I did crack under pressure and use it for this recipe. If you are completely opposed, just make a simple bechamel sauce (such as this recipe http://www.epicurious.com/recipes/food/views/White-Sauce-or-Bechamel-Sauce-40046). But today I needed to save myself the time and just use the dreaded can of soup. I served this fantastic creation with some fat-free refried beans (I had left over from the baked tacos last week) and sauteed greens.
Happy Cooking!
Sarah

recipe based on http://skinnymom.com/2012/05/11/skinny-sour-cream-enchiladas/?_szp=160707
16 oz. fat free sour cream
1 can fat free cream of chicken soup
1/4 cup chopped fresh cilantro
2 1/2 cups cooked shredded chicken breast (recipe I used is below)
1 small onion, chopped
1 can diced tomatoes with green chilies
1 can diced green chilies
8-10 low carb tortillas (my recipe made 10, but my tortillas were small)
1 cup shredded reduced fat pepper jack and colby cheese blend
If you have some leftover chicken, then go ahead and use it up. But if you are like me and need to create some shredded chicken for this recipe then please see below for my quick and easy cilantro lime poached chicken.
To poach the chicken: Fill a large frying pan half way with water. Add 2 boneless, skinless chicken breasts (trimmed of all fat) and sprinkle them generously with salt and pepper. Then add the following to the poached liquid: 2 cloves of garlic cut in half, 1/2 small onion cut in half, 1/2 lime cut into 4 pieces (juice squeezed into pan and rind thrown in) and 4 sprigs of cilantro.
 |
| My quick cilantro lime poached chicken, before the poaching began |
 |
| And they are done! |

Now to the enchiladas: We will continue to use the same frying pan for this entire recipe, (especially since I'm always looking for a way to cut down on the number of dishes to wash). So wipe the pan out with a damp paper towel and put back on the heat. Add 1 T of olive oil and the chopped onion. Cook the onion until translucent. Add the canned tomatoes with chilies and the can of chilies. Stir to combine. Cook for 2-3 minutes or until heated through.


 |
| Here's the kind of tortilla I used this time! |
 |
| My little guy working hard to help mommy! |

Now pour the sauce over the enchiladas and spread evenly. It may look like a lot, but it will settle as it cook in the oven.


Sprinkle the cheese on top and bake at 400 degrees for 20-30 minutes, until the sauce is bubbly and the cheese is melty.


Tuesday, April 23, 2013
Mushroom Agnolotti with Spinach and a Light Lemon Wine Sauce

So yummy!!! It was a simple meal that even beginners can make and it will look and taste like you ordered it at a 5 star Italian restaurant - I promise. Of course you will need to be a mushrooms lover to eat this version, but you can make substitutions (a different kind of ravioli and no mushrooms added, maybe another veggie instead). I hope you give this one a try!
Happy Cooking!
Sarah
Mushroom Agnolotti with Spinach in a Light Lemon Wine Sauce
1 T butter
1 T olive oil
8 oz sliced mushrooms
1/2 tsp herbs de Provence
Salt & pepper to taste
1 clove of minced garlic
the juice and zest of 1/2 of a lemon
1/4 cup dry white wine (I use what I like to drink - Savignon Blanc or Pinot Grigio)
1/2 cup pasta water
6 oz baby spinach
1/4 cup grated Parmesan cheese
9 oz wild mushroom agnolotti (look for it in the refrigerated pasta section of your local grocery store)
Boil a large pot of water for the ravioli (I add salt and some olive oil). Meanwhile heat a large saucepan over medium heat. Add 1 tablespoon each butter and olive oil. Add the sliced mushrooms, herbs de provence, and salt & pepper.

Stir to combine. Cook for about 5-7 minutes, stirring occasionally and allowing the mushrooms to cook down until tender and golden brown. Now add the minced garlic and cook for 30 seconds.

Then add the lemon juice, lemon zest, and white wine. Stir to deglaze the pan and bring to a boil. At this point you want to add the fresh ravioli to the boiling water, as it will only take 4-5 minutes to cook as you finish off your sauce. Remove 1 cup of pasta water (after you've added the pasta - you need the starch to bring the sauce together). Add the pasta water to the mushrooms and sauce, then immediately add the spinach. Stir and the spinach should cook very quickly. Once the spinach has wilted, remove the sauce from the heat.


Stir to combine and allow the ravioli to sit in the sauce for about 5 minutes (at this point, add more pasta water if you need to create more sauce). Cover with a lid to keep hot. This allows the pasta to absorb some of the flavor. Serve with more cheese sprinkled on top.

So yummy!!! I served this dish with a side of roasted asparagus, my favorite spring vegetable! Enjoy!!!

Monday, April 22, 2013
Week 16 - Sweet Simplicity
Last week was a long week, not just because of the Boston Marathon bombings and the days that followed, but because it was school vacation week and my baby girl was teething. The boy is back in school this week, but baby girl continues to be very needy (hopefully its only teething and not another ear infection) and my husband is working long hours. I'm looking for simple meals to get me through this week.
My fitness routine has changed slightly - I've began to include the following strength workouts to compliments any other kickboxing or running/walking I'm able to fit in with my children. I've been finding all of these workouts at Peanut Butter Fingers...awesome routines on her blog!!!
- This one will work your whole body:
http://www.pbfingers.com/2012/12/29/weekend-circuit-workout/
- Another great full body workout with cardio mixed in:
http://www.pbfingers.com/2012/09/29/saturday-morning-circuit-workout/
- This one includes cardio and strength that targets your abs:
http://www.pbfingers.com/2013/02/06/sweat-it-out-cardio-and-abs-circuit-workout/
- And this final routine is for your arms only. I add it on to the end of a cardio session (after I run/walk, bike, or at the end of the cardio routine listed in the next section of this post):
http://www.ivillage.com/how-tone-your-arms-0/4-b-489324?cid=pin|workout|tonearms|11-06-12
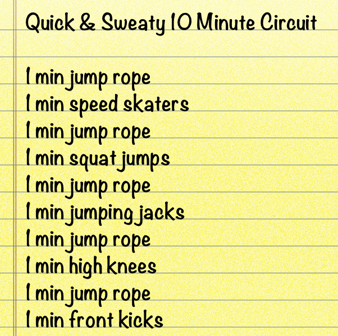
I always warm up before and stretch after. And I'm still exercising every day, fitting it in anyway I can (taking baby girl for a walk/run in the stroller, exercising with the kids, taking them to the tennis courts and chasing tennis balls around...anything to get to 30-40 minutes a day). And here's a quick 10 minute cardio routine that you can do while you are having a dance party with the kids:
http://www.pbfingers.com/wp-content/uploads/2013/04/photo.png
Back to week 16 meals: You'll find my weekly meal plan below along with any links that inspired me. Remember that you can substitute any vegetables for ones that you love, but always have vegetables be at least half your plate at lunch and dinner. You'll feel more full for very few calories. Have a fantastic week!
Happy Cooking!
Sarah

Week 16: April 21, 2013
Sunday: date night
Monday: store- bought ravioli (on sale at my local grocery store) tossed with a little olive oil, garlic, sauteed mushrooms and spinach. Served with roasted asparagus.
Tuesday: skinny white chicken enchiladas with sauteed greens
http://skinnymom.com/2012/05/11/skinny-sour-cream-enchiladas/?_szp=160707
Wednesday: crockpot BBQ ribs, skinny dill potato salad, roasted broccoli (all original recipes that I will post)
Thursday: leftovers
Friday: pizza night
Saturday: roasted chicken, couscous, salad (chickens are on sale AGAIN, so why not take advantage?) http://deliciouslydomesticdining.blogspot.com/2013/03/garlic-and-citrus-roasted-chicken.html
Subscribe to:
Posts (Atom)